


Table of contents
- Step 1: Initialize Your Project with npm
- Step 2: Create a README.md File
- Step 3: Initialize a Git Repository
- Step 4: Set Up Temporary Data Storage
- Step 5: Add .gitignore file
- Step 6: Add .env files
- Step 7: Add .env.sample file
- Step 8: Create a src folder
- Step 9: Update your package.json
- Step 10: Install Nodemon as a Dev Dependency
- Step 11: Update Your Dev Script for Nodemon
- Step 12: Organize Your src Folder Structure
- Step 13: Install Prettier npm Package
- Step 14: Include .prettierrc and .prettierignore Files
Step 1: Initialize Your Project with npm
Begin by creating an empty folder for your project. Then, start the setup process by initializing a new npm package using the following command:
npm init
Follow the prompts to provide the necessary information for your project. If you prefer to skip the prompts and use default values, you can simply run:
npm init -y
This command will initialize the npm package with default values

Step 2: Create a README.md File
Next, it's essential to include a README.md file in your project. This file serves as a guide for users and contributors, outlining the functionality of your project and providing important information. You can update this file in the future to include details on how to set up the project, list contributors, establish contribution guidelines, and more. Several templates can be found online. You can use readme.so to create and edit your readme file.
Step 3: Initialize a Git Repository
Now, let's initialize a Git repository for your project. Begin by running the following command in your project directory:
git init
This command initializes an empty Git repository locally. Next, log in to your GitHub account and create a new empty repository. Once created, follow the instructions provided by GitHub to add your project to the repository.

Step 4: Set Up Temporary Data Storage
In your project structure, create a public folder along with a temp folder inside it. These folders serve as temporary storage for various types of data. This step is optional and depends on your application's scale and specific requirements. It can be particularly useful for handling user uploads, where you might need to process or validate data before permanently storing it.
For example, if you are requesting images from users, you can utilize the temp folder to temporarily store these images before processing and transferring them to your servers or cloud storage (e.g., Cloudinary).
Step 5: Add .gitignore file
To maintain a clean and efficient Git repository, include a .gitignore file in your project. This file specifies which files and directories should be excluded from version control, preventing them from being pushed to GitHub. Common files .gitignore file include node_modules (which stores dependencies) and .env (which contains environment variables).
You can generate a .gitignore file tailored to your project's stack using online tools like gitignore.io.
Step 6: Add .env files
Include .env files to manage environment variables such as your MongoDB URI (MONGO_URI), JWT secret (JWT_SECRET), and other sensitive information. These variables help configure and customize your application's behavior across different environments (e.g., development, staging, production).
Your project should look something like this.

Step 7: Add .env.sample file
Your .env file will be part of your .gitignore file, hence if someone trying to clone your project won't be able to know the required environment variables. To remedy this you have 2 options.
Option 1: Mention environment variables inside your README.md.
Option 2: Create a .env.sample file. This file serves as a template that users can reference to know which environment variables are required and how they should be formatted. Users can then create their own .env file based on this template, replacing the sample values with their actual values.
Step 8: Create a src folder
To organize your project effectively, create a src (source) folder where you'll store all your backend code files and folders. This helps maintain a clear separation between your source code and other project assets.
Step 9: Update your package.json
To enable ES module syntax support in your Node.js project, you need to specify the "type": "module" field in your package.json file. This allows you to use ES module syntax (import/export) throughout your project, maintaining consistency between your backend and frontend codebases.
Here's a quick comparison between ES module syntax and CommonJS:
ES Module Syntax:
import x from 'y';
CommonJS Syntax:
const x = require('y');

Step 10: Install Nodemon as a Dev Dependency
Nodemon is a tool that helps develop Node.js based applications by automatically restarting the node application when file changes in the directory are detected.
Install Nodemon as a dev dependency. DevDependencies are the packages a developer needs during development.
Run the following command to install nodemon as a dev dependency:
npm install --save-dev nodemon
Step 11: Update Your Dev Script for Nodemon
To simplify the process of running your application during development, update your package.json file to include a "dev" script that uses nodemon to monitor changes and automatically restart your application. Here's how you can do it inside the package.json file:
"scripts": {
  "dev": "nodemon src/index.js"
},
With this setup, you can now start your development server using the following command:
npm run dev
This is done to provide a seamless development experience.
Step 12: Organize Your src Folder Structure
To maintain a well-structured and organized backend codebase, create the following folders and files within your src folder:
Folders:
Controllers: Contains the functional logic for handling requests.
Db: Includes database configuration files.
Middlewares: Includes middleware functions for processing incoming requests.
Models: Stores database models for interacting with the database.
Routes: Contains backend route definitions.
Utils: Stores common utility functions used across the application such as pagination, filtering, etc.
Files:
app.js: Includes configuration settings for your application.
index.js: Serves as the starting point for your application.
constants.js: Includes constants such as PORT, DB_NAME, etc.

Step 13: Install Prettier npm Package
To ensure consistency in code formatting across users and environments, it's advisable to install the Prettier npm package as a project dependency. This allows you to enforce consistent code styling standards throughout your project.
Run the following command to install Prettier as a project dependency:
npm install --save-dev prettier
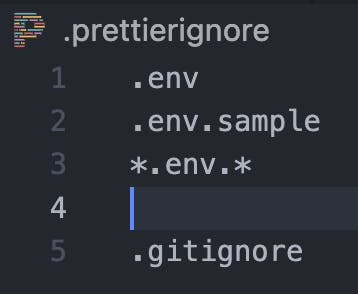
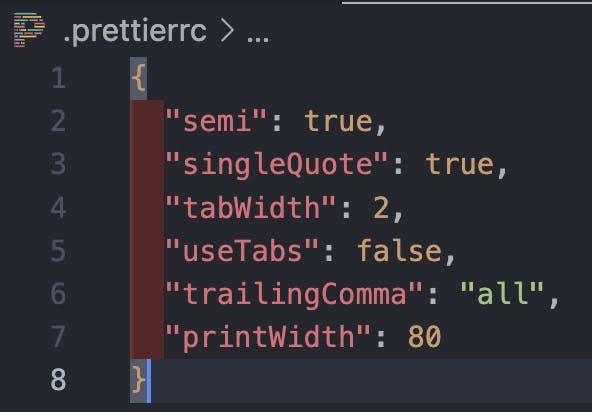
Step 14: Include .prettierrc and .prettierignore Files
.prettierignore include files like .env and .gitignore. We do not want these files to be changed due to prettier.
.prettierrc contains configurations such as tab width, singleQoute or doubleQoute, semi or not, etc.
Here is an example for both of these files
That's how you can set up a professional setup for a backend project in node js. Now you can continue and start creating any backend application. This is how your folder will look after the entire setup.

That's a wrap. Please share your thoughts below, and stay tuned for more insightful content in the future. Until next time!